02.Android Jetpack之Navigation
Android Jetpack 之 Navigation
为什么要从这个开始呢?
简单呀!!
更重要的是
无论您如何构建应用界面(使用 Fragment、Activity 还是其他组件),都要为应用设计屏幕间导航的功能。
所以我们先来看看jetpack的navigation库
这个库在androidx.navigation下
基本使用
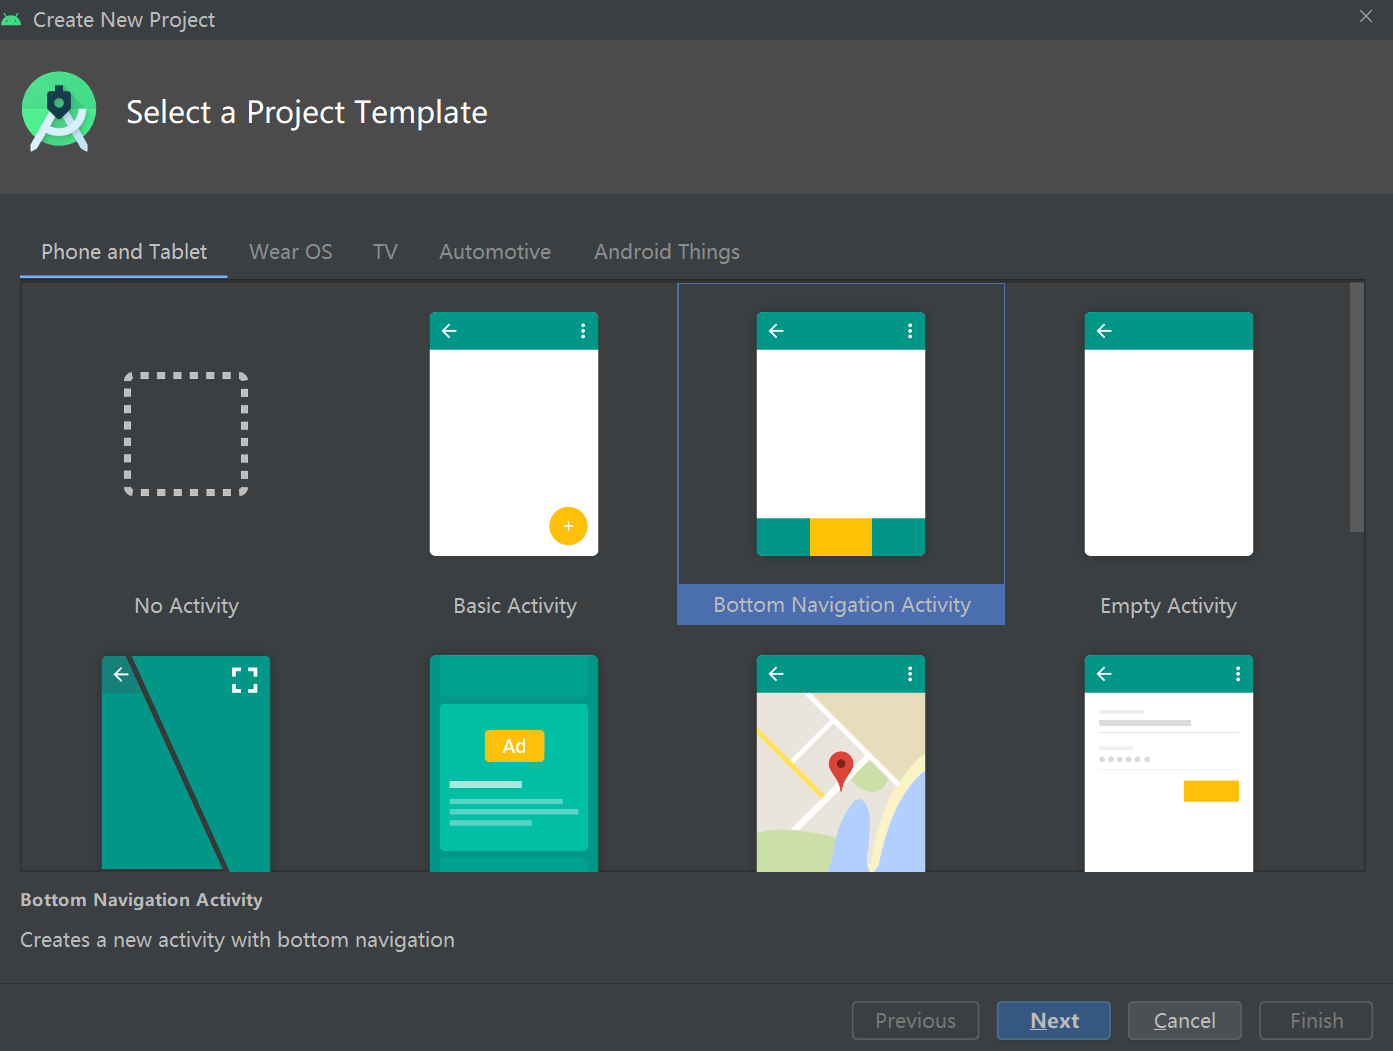
创建项目
学习阶段,我们可以直接创建
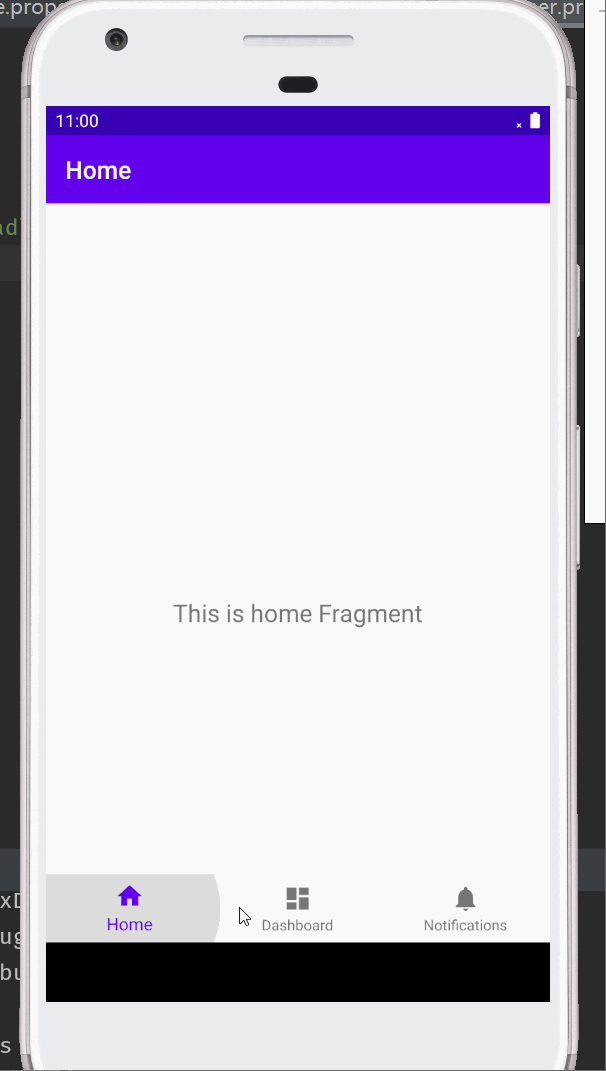
运行起来这样的效果:
分析使用代码
这是它的目录结构:
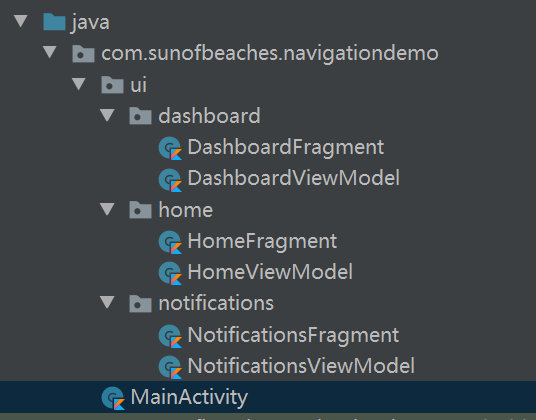
一个主的Activity,三个Fragment
主Activity的布局代码main_activity.xml
<?xml version="1.0" encoding="utf-8"?>
<androidx.constraintlayout.widget.ConstraintLayout
    xmlns:android="http://schemas.android.com/apk/res/android"
    xmlns:app="http://schemas.android.com/apk/res-auto"
    android:id="@+id/container"
    android:layout_width="match_parent"
    android:layout_height="match_parent"
    android:paddingTop="?attr/actionBarSize">

    <com.google.android.material.bottomnavigation.BottomNavigationView
        android:id="@+id/nav_view"
        android:layout_width="0dp"
        android:layout_height="wrap_content"
        android:layout_marginStart="0dp"
        android:layout_marginEnd="0dp"
        android:background="?android:attr/windowBackground"
        app:layout_constraintBottom_toBottomOf="parent"
        app:layout_constraintLeft_toLeftOf="parent"
        app:layout_constraintRight_toRightOf="parent"
        app:menu="@menu/bottom_nav_menu" />

    <fragment
        android:id="@+id/nav_host_fragment"
        android:name="androidx.navigation.fragment.NavHostFragment"
        android:layout_width="match_parent"
        android:layout_height="match_parent"
        app:defaultNavHost="true"
        app:layout_constraintBottom_toTopOf="@id/nav_view"
        app:layout_constraintLeft_toLeftOf="parent"
        app:layout_constraintRight_toRightOf="parent"
        app:layout_constraintTop_toTopOf="parent"
        app:navGraph="@navigation/mobile_navigation" />

</androidx.constraintlayout.widget.ConstraintLayout>
底部导航控件
这一部分:
    <com.google.android.material.bottomnavigation.BottomNavigationView
        android:id="@+id/nav_view"
        android:layout_width="0dp"
        android:layout_height="wrap_content"
        android:layout_marginStart="0dp"
        android:layout_marginEnd="0dp"
        android:background="?android:attr/windowBackground"
        app:layout_constraintBottom_toBottomOf="parent"
        app:layout_constraintLeft_toLeftOf="parent"
        app:layout_constraintRight_toRightOf="parent"
        app:menu="@menu/bottom_nav_menu" />
就是我们的底部切换的Tab,看名字同学们就知道了,BottomNavigationView,底部导航控件
它显示的内容由哪里控制呢?
app:menu="@menu/bottom_nav_menu"
这里有一个menu的属性,所显示的内容,就是由这里控制的。上图我们看到Home、Dashboard、Notifications
我们打开这个文件看看:
<?xml version="1.0" encoding="utf-8"?>
<menu xmlns:android="http://schemas.android.com/apk/res/android">

    <item
        android:id="@+id/navigation_home"
        android:icon="@drawable/ic_home_black_24dp"
        android:title="@string/title_home" />

    <item
        android:id="@+id/navigation_dashboard"
        android:icon="@drawable/ic_dashboard_black_24dp"
        android:title="@string/title_dashboard" />

    <item
        android:id="@+id/navigation_notifications"
        android:icon="@drawable/ic_notifications_black_24dp"
        android:title="@string/title_notifications" />

</menu>
所以同学们以后使用BottomNavigationView知道怎么用了吧!
这就是模版代码了,拿到以后,修改成你的就行了。
到这里的话,显示出底部的几个tab,是可以的。但是怎么样跟顶部的Fragment进行联动呢?我们后面再看,接下来,我们看看fragment的代码,也就是上面部分的代码。
fragment的代码
这是fragment部分的代码
    <fragment
        android:id="@+id/nav_host_fragment"
        android:name="androidx.navigation.fragment.NavHostFragment"
        android:layout_width="match_parent"
        android:layout_height="match_parent"
        app:defaultNavHost="true"
        app:layout_constraintBottom_toTopOf="@id/nav_view"
        app:layout_constraintLeft_toLeftOf="parent"
        app:layout_constraintRight_toRightOf="parent"
        app:layout_constraintTop_toTopOf="parent"
        app:navGraph="@navigation/mobile_navigation" />
这里竟然是一个fragment,但是上方是怎么显示多个fragment并且切换的呢?
其实这个fragment是管理的fragment,也就是坑。
我们通过配置文件,把其他的配置文件填到这个坑里
眼睛犀利的同学估计已经发现了
app:navGraph="@navigation/mobile_navigation"
这又是一个配置文件
对的,没错。这个配置文件,就是配置这个hostFragment要管理的fragment
我们看看代码:
<?xml version="1.0" encoding="utf-8"?>
<navigation xmlns:android="http://schemas.android.com/apk/res/android"
    xmlns:app="http://schemas.android.com/apk/res-auto"
    xmlns:tools="http://schemas.android.com/tools"
    android:id="@+id/mobile_navigation"
    app:startDestination="@+id/navigation_home">

    <fragment
        android:id="@+id/navigation_home"
        android:name="com.sunofbeaches.navigationdemo.ui.home.HomeFragment"
        android:label="@string/title_home"
        tools:layout="@layout/fragment_home" />

    <fragment
        android:id="@+id/navigation_dashboard"
        android:name="com.sunofbeaches.navigationdemo.ui.dashboard.DashboardFragment"
        android:label="@string/title_dashboard"
        tools:layout="@layout/fragment_dashboard" />

    <fragment
        android:id="@+id/navigation_notifications"
        android:name="com.sunofbeaches.navigationdemo.ui.notifications.NotificationsFragment"
        android:label="@string/title_notifications"
        tools:layout="@layout/fragment_notifications" />
</navigation>
这里面呢,有三个fragment
    <fragment
        android:id="@+id/navigation_home"
        android:name="com.sunofbeaches.navigationdemo.ui.home.HomeFragment"
        android:label="@string/title_home"
        tools:layout="@layout/fragment_home" />
这几个属性应该不难理解吧,id,name属性指向我们的fragment,label是标签,layout是布局
app:startDestination="@+id/navigation_home"
这个属性表示什么意思呢?
表示默认要显示的页面,这里指向的是navigation_home,所以当我们启动起来的时候,默认显示的是HomeFragment
到这里,我们就知道了顶部的几个页面是怎么来的了。
再回去看看首页布局的代码
    <fragment
        android:id="@+id/nav_host_fragment"
        android:name="androidx.navigation.fragment.NavHostFragment"
        android:layout_width="match_parent"
        android:layout_height="match_parent"
        app:defaultNavHost="true"
        app:layout_constraintBottom_toTopOf="@id/nav_view"
        app:layout_constraintLeft_toLeftOf="parent"
        app:layout_constraintRight_toRightOf="parent"
        app:layout_constraintTop_toTopOf="parent"
        app:navGraph="@navigation/mobile_navigation" />
这里有一个
app:defaultNavHost="true"
这个是什么意思呢?
这个其实是把返回按键的事件交给NavHostFragment处理。控制被管理的fragment/activity/dailog的返回。
okay,到这里的话,我们基本上就把上下两部分看完了。
那么它们两是怎么联动起来的呢?
点击底部的tab,就会切换顶部的fragment
底部navigationView与顶部fragment的联动
我们面向对象的思想,最简单的思维就是监听BottomNavigationView的选中变化,然后切换顶部的fragment。
这些都是Android的官方套件,所以google也希望我们一起使用。
既然希望我们组合使用的话,所以他们把这个切换的动作已经实现了,简单地关联上就行了。
看看代码吧
        //找到底部的导航控件
        val navView: BottomNavigationView = findViewById(R.id.nav_view)
        //找到hostFragment
        val navController = findNavController(R.id.nav_host_fragment)
        //关联起来
        navView.setupWithNavController(navController)
这样子,就关联起来了。底部的tab切换,上方的fragment则会切换了。
这就是fragment最基本的使用了。只有这些吗?当然不是!
Navigation视图编辑器
这一部分,同学们最好还是看视频吧,毕竟图片不好描述操作。
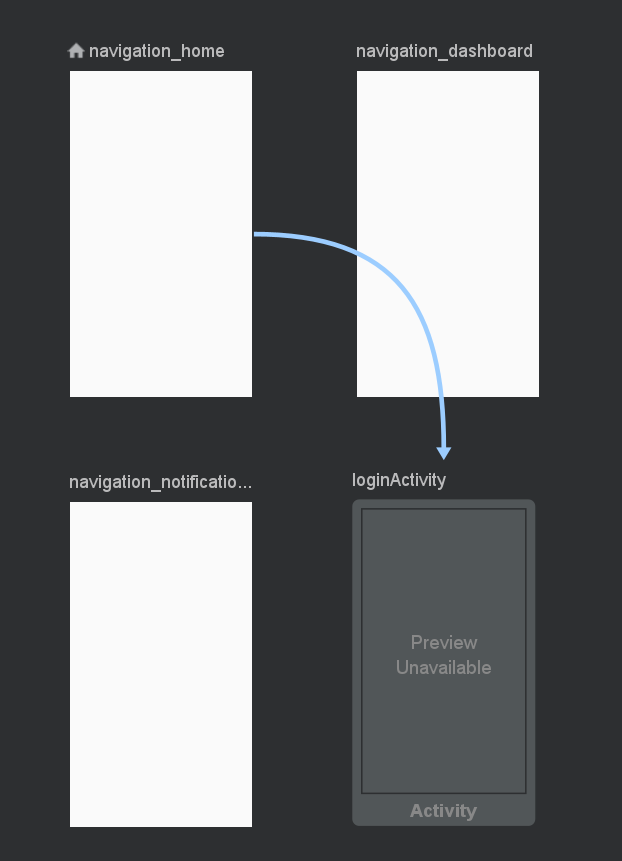
打开我们的/res/navigation/mobile_navigation.xml文件
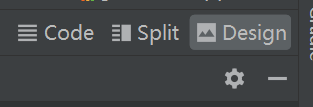
然后切换到设计视图界面,右上角
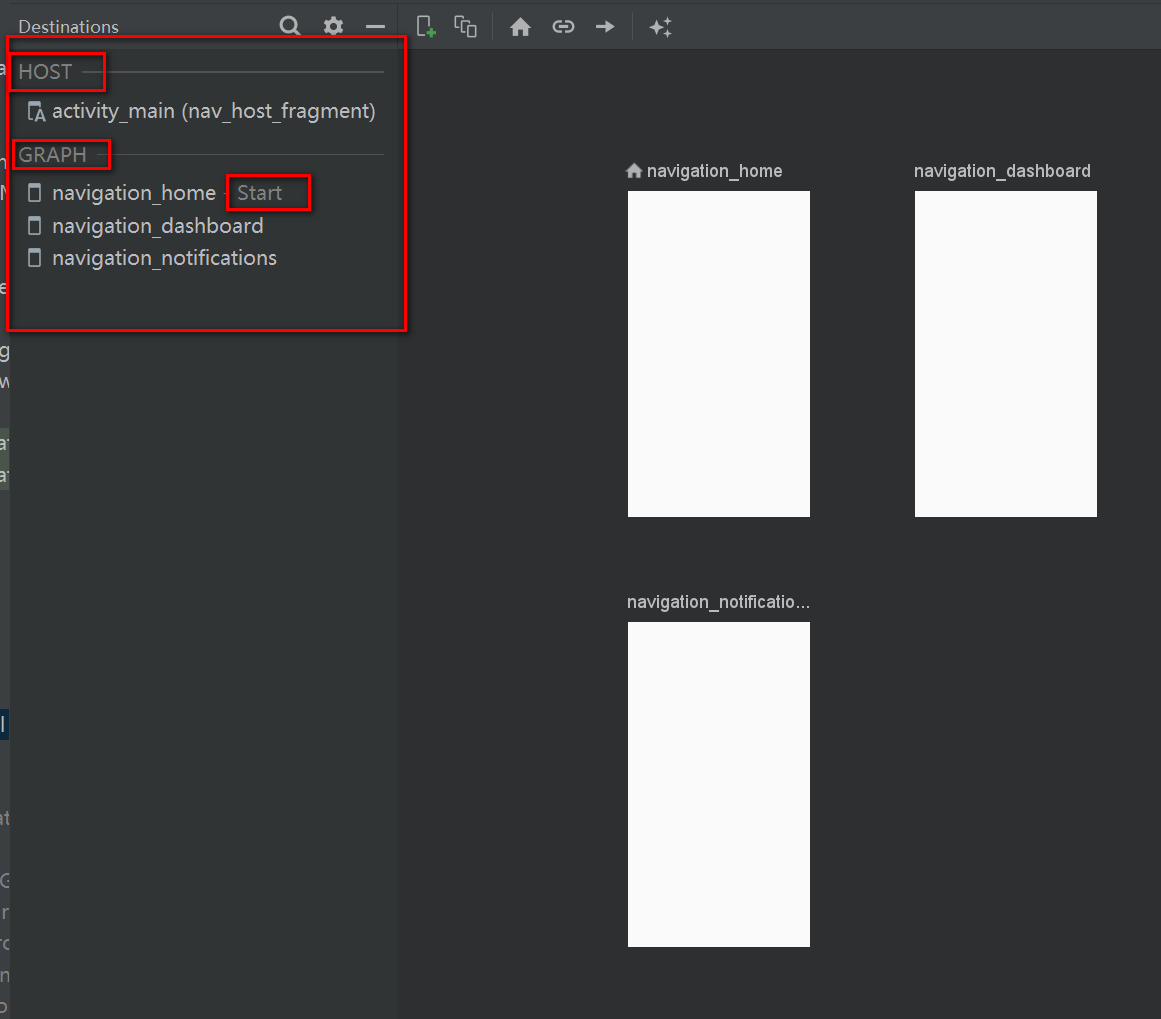
从左侧视图可以看出结构,以及入口
前面我们说了,我们的navigation不仅可以管理fragment,也可以有activity,fragmentDialog
我们顺势,创建一个登录的activity吧
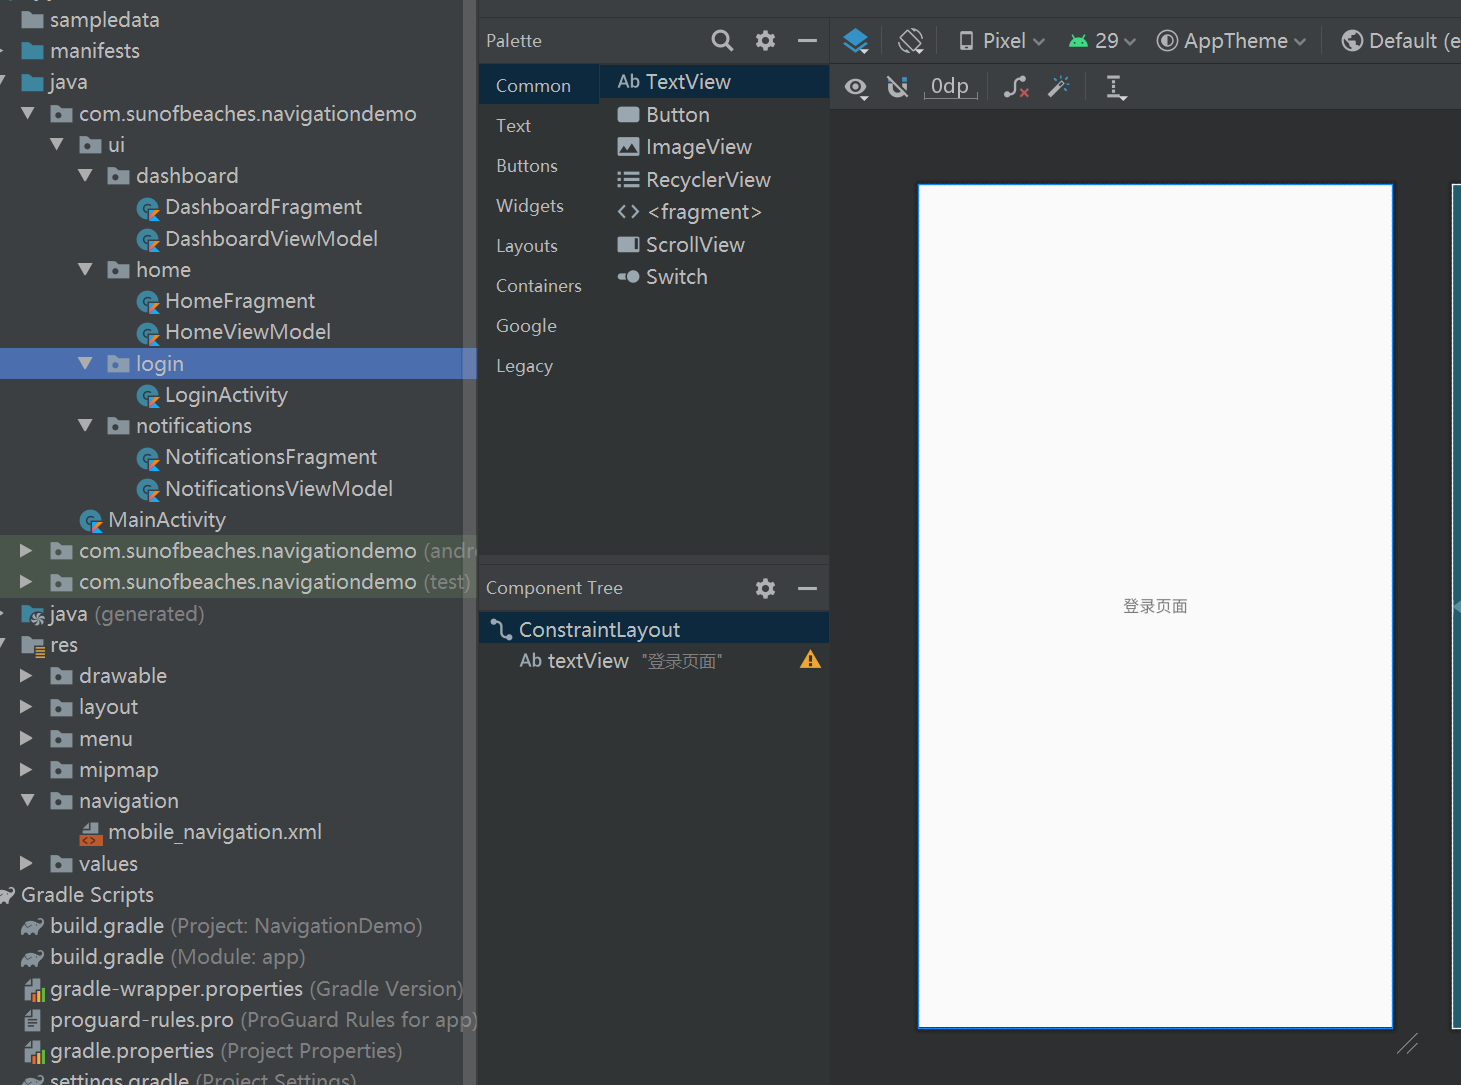
记得要在清单文件里注册一下。
然后点击视图左上角的添加按钮
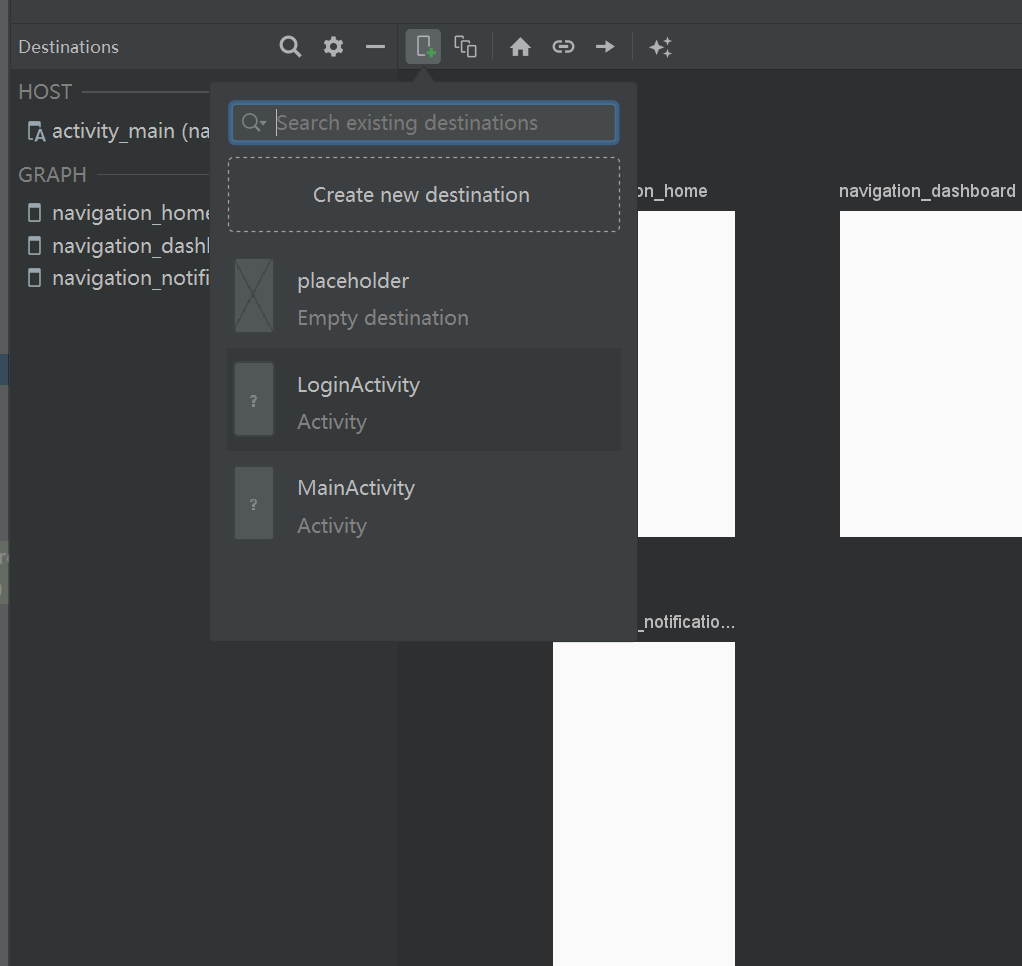
添加完以后:
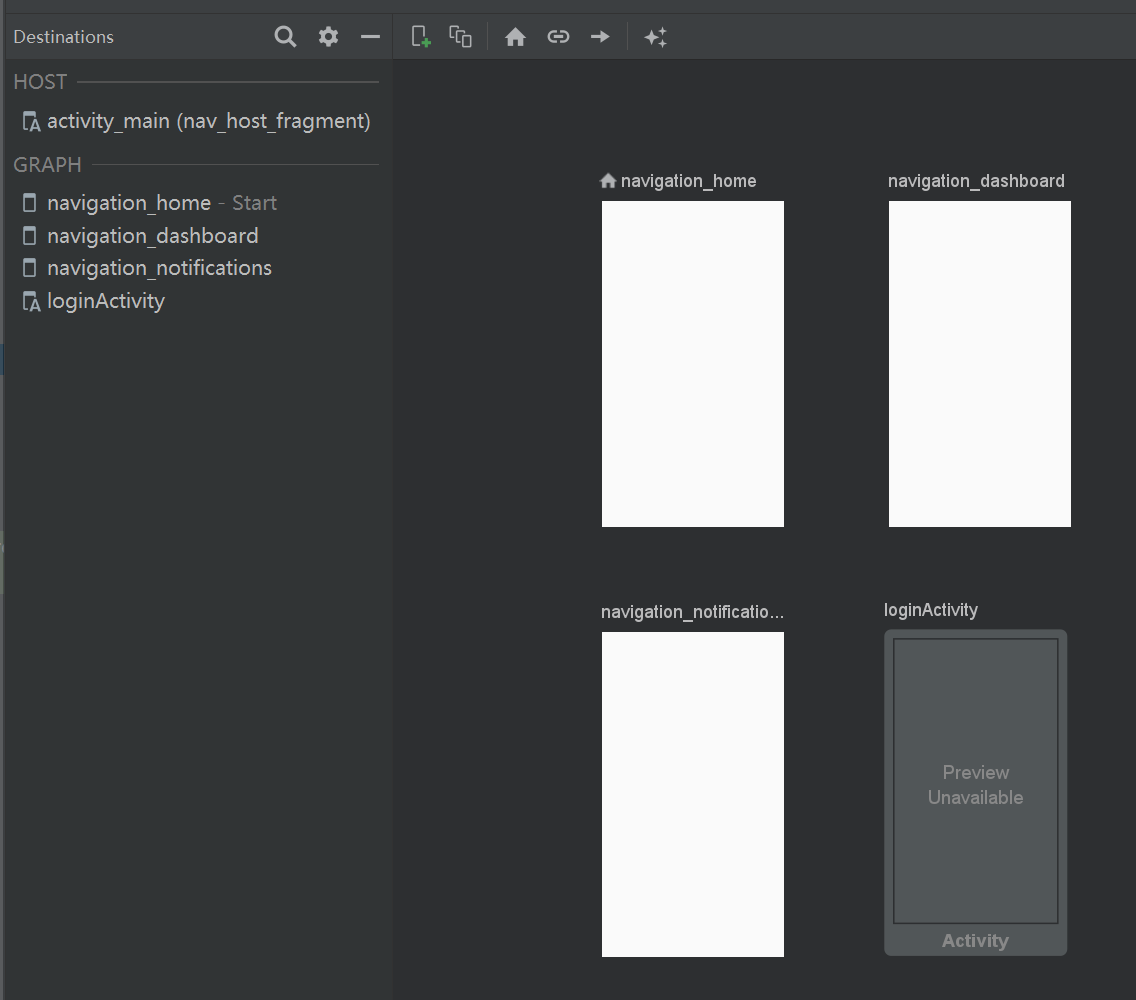
对应的xml文件也会多了一个activity

那又如何进行跳转呢?
页面跳转
比如说,我们要在首页-跳转-登录的activity上
我们选中home fragment,然后点击添加action的图标
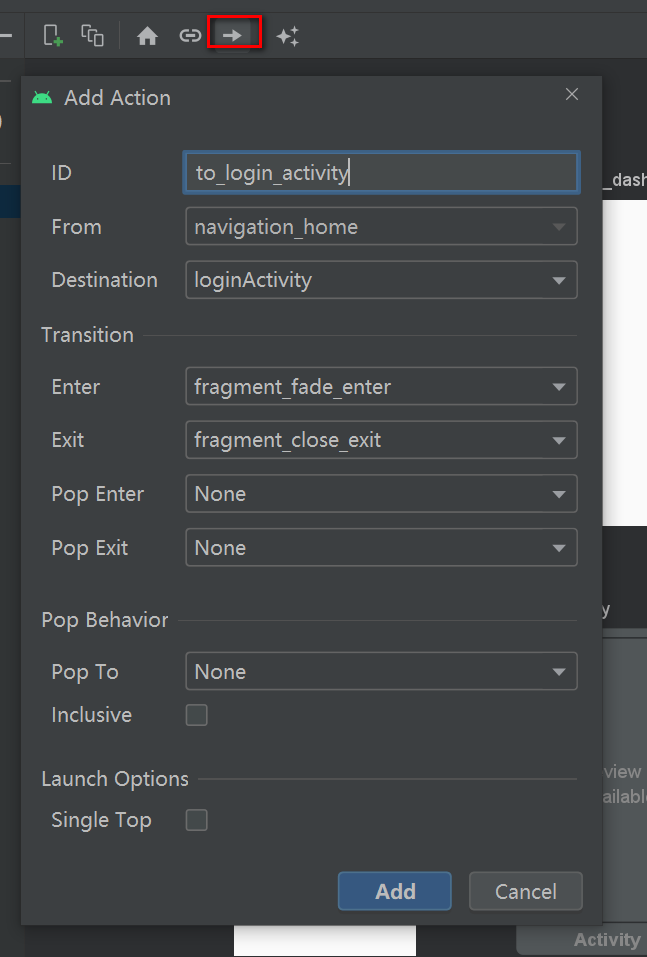
还可以添加动画,如图,其他属性请看视频吧。
添加完以后
对应的xml文件就会有:
    <fragment
        android:id="@+id/navigation_home"
        android:name="com.sunofbeaches.navigationdemo.ui.home.HomeFragment"
        android:label="@string/title_home"
        tools:layout="@layout/fragment_home" >
        <action
            android:id="@+id/to_login_activity"
            app:destination="@id/loginActivity"
            app:enterAnim="@anim/fragment_fade_enter"
            app:exitAnim="@anim/fragment_close_exit" />
    </fragment>
到这一步,还没行,我们只是声明了跳转关系,我们真的要跳转,还得添加简单的代码。
在我们的HomeFragment里添加一个跳转的按钮
        val root = inflater.inflate(R.layout.fragment_home, container, false)

        val loginBtn = root.findViewById<Button>(R.id.toLoginPage)
        loginBtn.setOnClickListener {
            Navigation.findNavController(root).navigate(R.id.to_login_activity)
        }
这里面主要有一个Navigation.findNavController(root).navigate方法。
这个方法就是跳转到某个地方去,有多个重载方法:
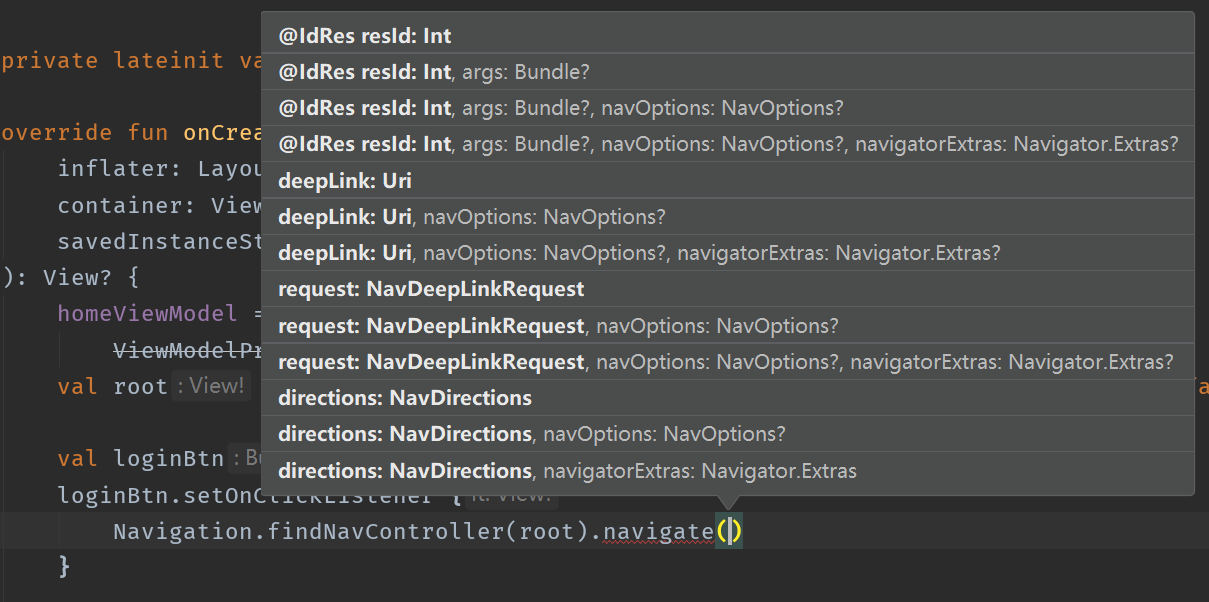
可以使用deepLink,可以使用directions,也可以传参。这个后面我们再细分讲吧。
动画请参考这篇文章
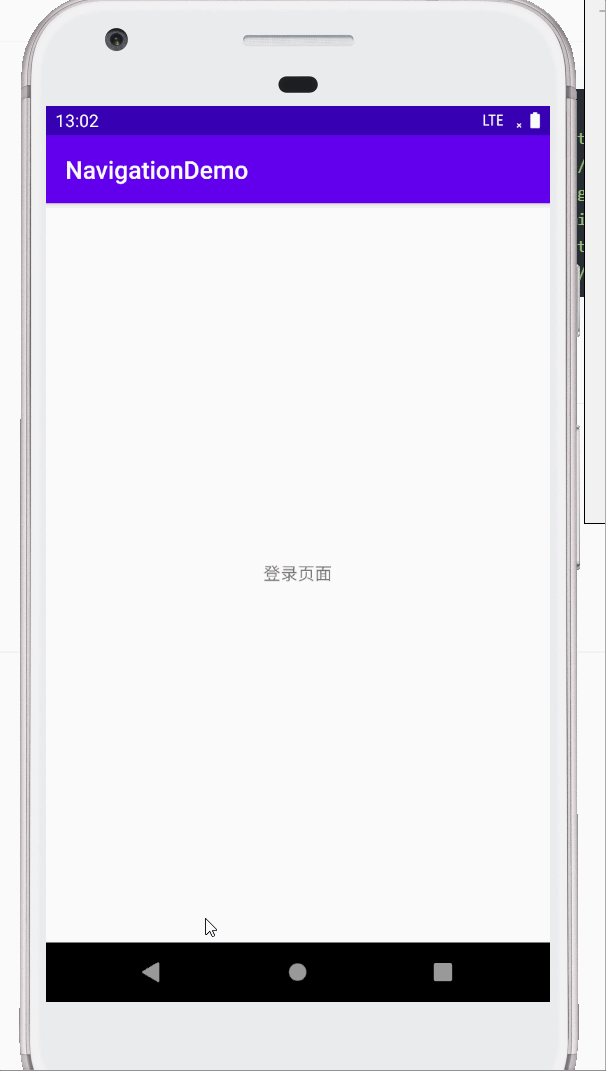
跳转效果:
跳转传参数
比如说我们的LoginActivity你可以给它传一个phoneNumber
跳转的时候,我们携带参数
     loginBtn.setOnClickListener {
            val userInfo = Bundle()
            userInfo.putString("phoneNumber", "15353979727")
            Navigation.findNavController(root).navigate(R.id.to_login_activity, userInfo)
        }
那么在LoginActivity端,我们怎么获取呢?
        val phoneNum = intent.extras!!.get("phoneNumber")
        println(phoneNum)
google推荐使用 Safe Args 传递安全的数据
这里的话不推荐大家使用这些方式组件之间传值,通过ViewModel来进行数据传递就好。
DeepLink
深度链接
简单的页面跳转
怎么深度呢?
这里的使用则比较简单
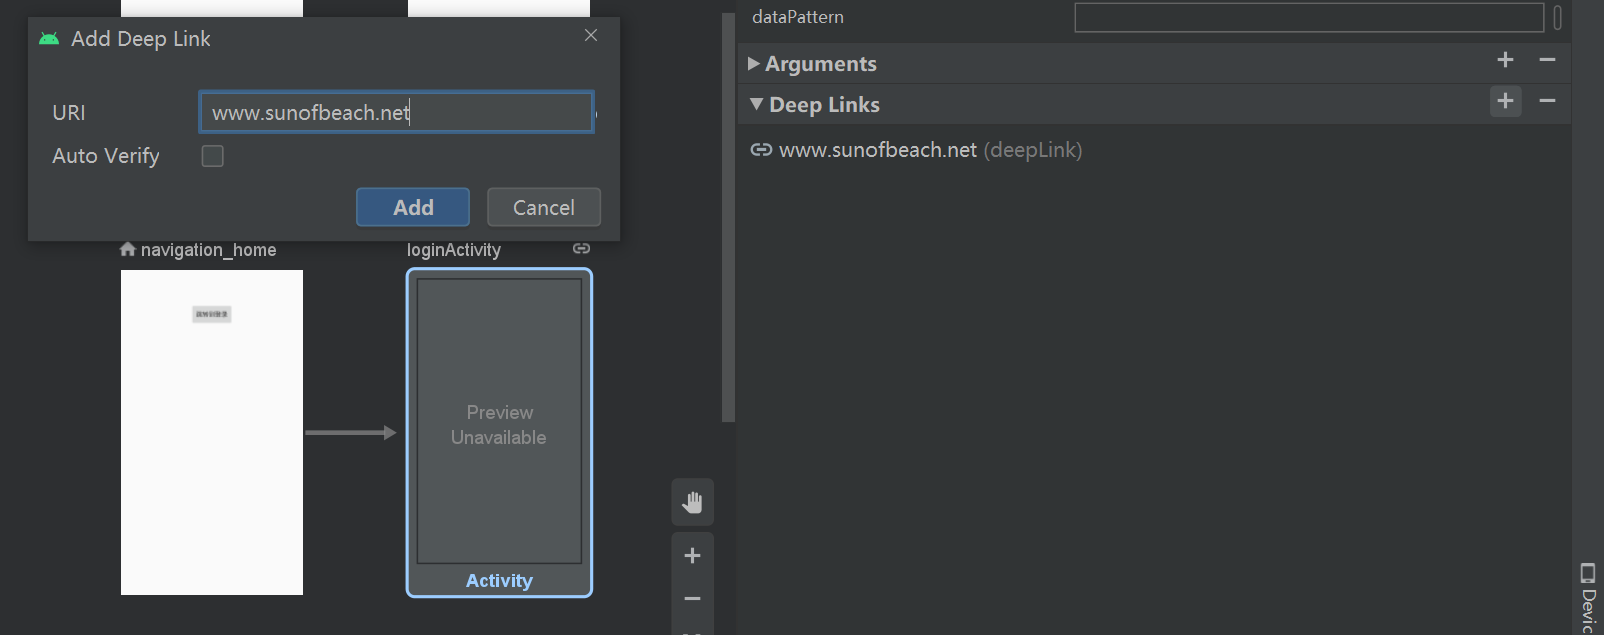
    <activity
        android:id="@+id/loginActivity"
        android:name="com.sunofbeaches.navigationdemo.ui.login.LoginActivity"
        android:label="LoginActivity">
        <deepLink
            android:id="@+id/deepLink"
            app:uri="www.sunofbeach.net" />
    </activity>
xml文件多了这个玩意,跳转代码
        val loginBtn = root.findViewById<Button>(R.id.toLoginPage)
        loginBtn.setOnClickListener {
            Navigation.findNavController(root).navigate(Uri.parse("https://www.sunofbeach.net"))
        }
跳转
网页打开应用某个页面
我们再看看这样一个案例:
类似于我们的隐式意图,同学们都用过。比如说在微信分享里打开链接后,会跳转到你对应的应用里。
比如说小程序里的打开其他应用
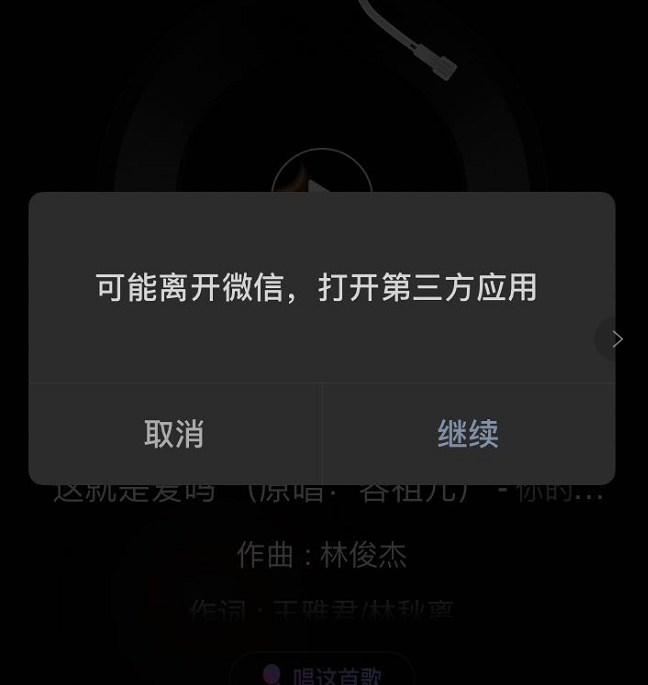
这个又是怎么实现的呢?
Activity注册的时候,意图过滤器这要写:
 <activity android:name=".ui.login.LoginActivity">
            <intent-filter>
                <action android:name="android.intent.action.VIEW" />

                <category android:name="android.intent.category.DEFAULT" />
                <category android:name="android.intent.category.BROWSABLE" />
                <data
                    android:host="www.sunofbeach.net"
                    android:path="/login"
                    android:scheme="sob" />
            </intent-filter>
        </activity>
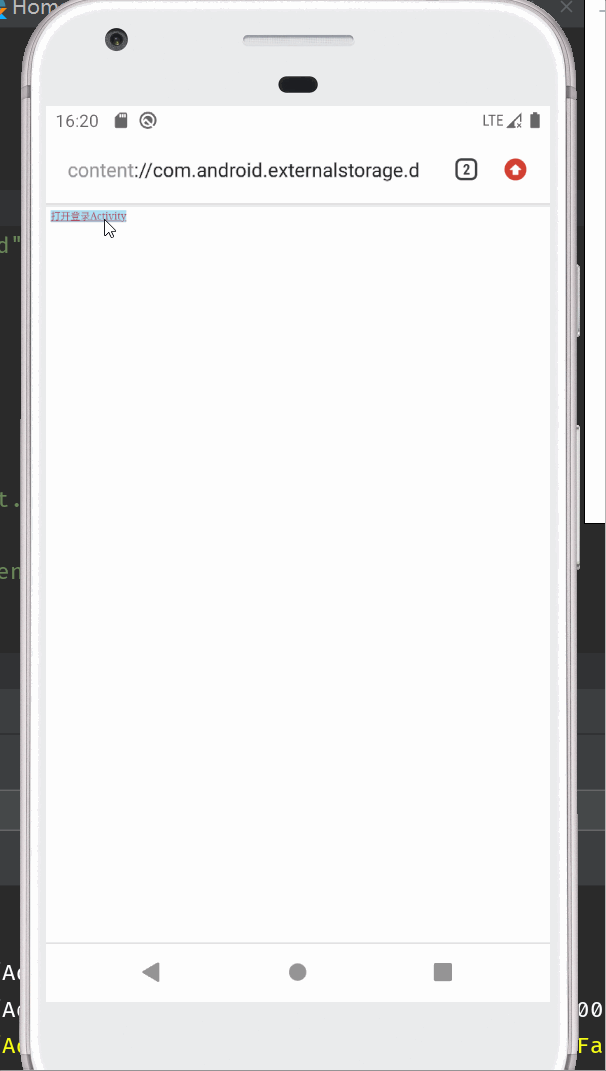
html文件怎么写呢?
<!DOCTYPE html PUBLIC "-//W3C//DTD HTML 4.01//EN" "http://www.w3.org/TR/html4/strict.dtd">
<html>
<head>
  <meta http-equiv="Content-Type" content="text/html; charset=utf-8">
  <meta http-equiv="Content-Style-Type" content="text/css">
  <title>测试Android手机打开Activity</title>
</head>
<body>
<a href="sob://www.sunofbeach.net/login">打开登录Activity</a>
</html>
测试
携带参数也很简单,在url上加参数即可
比如说sob://www.sunofbeach.net/login?from=AD8FSDYYtc
获取参数
    val from = intent.data!!.getQueryParameter("from")
        println(from)
结果:
I/System.out: AD8FSDYYtc
可以传参,是不是可以做很多功能了呀。
通知打开某个应用页面
再来一个应用场景:消息推送的时候,打开某一个页面。比如说我们向客户端推送一篇广告文章,对吧!
通知官方文档notification
添加依赖
implementation "com.android.support:support-compat:28.0.0"
这里我们就创建一个通知
 private fun createNotification() {
        if (Build.VERSION.SDK_INT >= Build.VERSION_CODES.O) {
            val importance = NotificationManager.IMPORTANCE_DEFAULT
            val channel =
                NotificationChannel(
                    CHANNEL_ID, "sunofbeach notification",
                    importance
                ).apply {
                    description = "channel of sunofbeach application."
                }
            // Register the channel with the system
            val notificationManager: NotificationManager =
                requireContext().getSystemService(Context.NOTIFICATION_SERVICE) as NotificationManager
            notificationManager.createNotificationChannel(channel)
        }
        val notification = NotificationCompat
            .Builder(requireContext(), CHANNEL_ID)
            .setAutoCancel(true)
            .setContentIntent(getPaddingIntent())
            .setContentTitle("这是一条打开登录界面的通知")
            .setSmallIcon(R.mipmap.ic_launcher)
            .build()

        val notificationManager = NotificationManagerCompat.from(requireContext())
        notificationManager.notify(12345690, notification)
    }

    private fun getPaddingIntent(): PendingIntent {
        return Navigation.findNavController(requireView())
            .createDeepLink()
            .setGraph(R.navigation.mobile_navigation)
            .setDestination(R.id.loginActivity)
            .createPendingIntent()
    }
我们点击通知的时候,就可以打开对应的界面了。
如果需要设置参数则这样写:
    private fun getPaddingIntent(): PendingIntent {
        val args = Bundle()
        args.putString("phone", "12345678901")
        return Navigation.findNavController(requireView())
            .createDeepLink()
            .setArguments(args)
            .setGraph(R.navigation.mobile_navigation)
            .setDestination(R.id.loginActivity)
            .createPendingIntent()
    }
okay,到这里的话,我们这个跳转也搞定了
Navigation源码分析
配置文件是如何被加载的
app:navGraph="@navigation/mobile_navigation"
我们看到NavHostFragment的onCreate方法
@CallSuper
    @Override
    public void onCreate(@Nullable Bundle savedInstanceState) {
        super.onCreate(savedInstanceState);
        final Context context = requireContext();

        mNavController = new NavHostController(context);
        mNavController.setLifecycleOwner(this);
        mNavController.setOnBackPressedDispatcher(requireActivity().getOnBackPressedDispatcher());
        // Set the default state - this will be updated whenever
        // onPrimaryNavigationFragmentChanged() is called
        mNavController.enableOnBackPressed(
                mIsPrimaryBeforeOnCreate != null && mIsPrimaryBeforeOnCreate);
        mIsPrimaryBeforeOnCreate = null;
        mNavController.setViewModelStore(getViewModelStore());
        onCreateNavController(mNavController);

        Bundle navState = null;
        if (savedInstanceState != null) {
            navState = savedInstanceState.getBundle(KEY_NAV_CONTROLLER_STATE);
            if (savedInstanceState.getBoolean(KEY_DEFAULT_NAV_HOST, false)) {
                mDefaultNavHost = true;
                getParentFragmentManager().beginTransaction()
                        .setPrimaryNavigationFragment(this)
                        .commit();
            }
            mGraphId = savedInstanceState.getInt(KEY_GRAPH_ID);
        }

        if (navState != null) {
            // Navigation controller state overrides arguments
            mNavController.restoreState(navState);
        }
        if (mGraphId != 0) {
            // Set from onInflate()
            mNavController.setGraph(mGraphId);
        } else {
            // See if it was set by NavHostFragment.create()
            final Bundle args = getArguments();
            final int graphId = args != null ? args.getInt(KEY_GRAPH_ID) : 0;
            final Bundle startDestinationArgs = args != null
                    ? args.getBundle(KEY_START_DESTINATION_ARGS)
                    : null;
            if (graphId != 0) {
                mNavController.setGraph(graphId, startDestinationArgs);
            }
        }
    }
我们可以找到
mNavController.setGraph(mGraphId);
这个代码,如果mGraphId不为0直接处理,如果mGraphId为0,则通过其他方式获取一下。
接着就设置进去
通过资源ID调用的方法,会走到这里
    public void setGraph(@NavigationRes int graphResId, @Nullable Bundle startDestinationArgs) {
        setGraph(getNavInflater().inflate(graphResId), startDestinationArgs);
    }
看这个
getNavInflater().inflate(graphResId)
这个方法的调用,就是把xml转成bean类
public NavGraph inflate(@NavigationRes int graphResId) {
        Resources res = mContext.getResources();
        XmlResourceParser parser = res.getXml(graphResId);
        final AttributeSet attrs = Xml.asAttributeSet(parser);
        try {
            int type;
            while ((type = parser.next()) != XmlPullParser.START_TAG
                    && type != XmlPullParser.END_DOCUMENT) {
                // Empty loop
            }
            if (type != XmlPullParser.START_TAG) {
                throw new XmlPullParserException("No start tag found");
            }

            String rootElement = parser.getName();
            NavDestination destination = inflate(res, parser, attrs, graphResId);
            if (!(destination instanceof NavGraph)) {
                throw new IllegalArgumentException("Root element <" + rootElement + ">"
                        + " did not inflate into a NavGraph");
            }
            return (NavGraph) destination;
        } catch (Exception e) {
            throw new RuntimeException("Exception inflating "
                    + res.getResourceName(graphResId) + " line "
                    + parser.getLineNumber(), e);
        } finally {
            parser.close();
        }
    }
也就是会返回对象NavGraph,这个给到了谁呢?
    public void setGraph(@NonNull NavGraph graph, @Nullable Bundle startDestinationArgs) {
        if (mGraph != null) {
            // Pop everything from the old graph off the back stack
            popBackStackInternal(mGraph.getId(), true);
        }
        mGraph = graph;
        onGraphCreated(startDestinationArgs);
    }
就在NavController里头。
看完这个,我们就知道了,我们可以不使用xml进行配置,我们使用Java代码,或者使用Json来配置也是可以的。我们稍微修改一下代码,就可以进行扩展了。
这里的话,打个TODO吧,后面在我们的课程里,我们改成通过注解的方式,来实现配置。
fragment的切换方式
要看这代码,我们从哪里入手呢?
前面我们是不是有切换fragment的动作呀?没有,我们只是做跳转到activity,但是我们点击底部的tab,会切换上方的fragment。
这就是我们的入口了。
        //找到底部的导航控件
        val navView: BottomNavigationView = findViewById(R.id.nav_view)
        //找到hostFragment
        val navController = findNavController(R.id.nav_host_fragment)
        navView.setupWithNavController(navController)
这是一个扩展函数
fun BottomNavigationView.setupWithNavController(navController: NavController) {
    NavigationUI.setupWithNavController(this, navController)
}
跟下去的话,我们会看到这么一行代码
navController.navigate(item.getItemId(), null, options);
一直走呀走,就会跟到这里
 Navigator<NavDestination> navigator = mNavigatorProvider.getNavigator(
                node.getNavigatorName());
        Bundle finalArgs = node.addInDefaultArgs(args);
        NavDestination newDest = navigator.navigate(node, finalArgs,
                navOptions, navigatorExtras);
这个navigator是什么类型,还得看拿出来的是什么东西。我们这里研究的是Fragment,所以拿出来的应该是
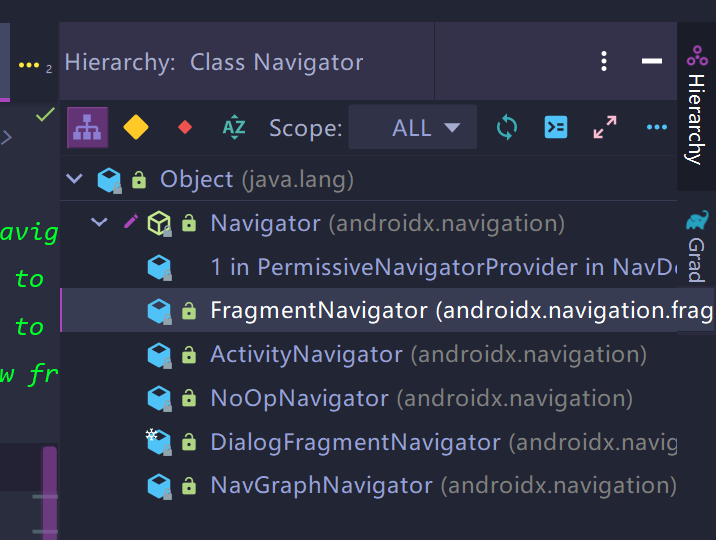
所以调用navite的时候,调用的其实是FragmentNavitor里的navite方法,也就是这个
public NavDestination navigate(@NonNull Destination destination, @Nullable Bundle args,
            @Nullable NavOptions navOptions, @Nullable Navigator.Extras navigatorExtras) {
        if (mFragmentManager.isStateSaved()) {
            Log.i(TAG, "Ignoring navigate() call: FragmentManager has already"
                    + " saved its state");
            return null;
        }
        String className = destination.getClassName();
        if (className.charAt(0) == '.') {
            className = mContext.getPackageName() + className;
        }
        final Fragment frag = instantiateFragment(mContext, mFragmentManager,
                className, args);
        frag.setArguments(args);
        final FragmentTransaction ft = mFragmentManager.beginTransaction();

        int enterAnim = navOptions != null ? navOptions.getEnterAnim() : -1;
        int exitAnim = navOptions != null ? navOptions.getExitAnim() : -1;
        int popEnterAnim = navOptions != null ? navOptions.getPopEnterAnim() : -1;
        int popExitAnim = navOptions != null ? navOptions.getPopExitAnim() : -1;
        if (enterAnim != -1 || exitAnim != -1 || popEnterAnim != -1 || popExitAnim != -1) {
            enterAnim = enterAnim != -1 ? enterAnim : 0;
            exitAnim = exitAnim != -1 ? exitAnim : 0;
            popEnterAnim = popEnterAnim != -1 ? popEnterAnim : 0;
            popExitAnim = popExitAnim != -1 ? popExitAnim : 0;
            ft.setCustomAnimations(enterAnim, exitAnim, popEnterAnim, popExitAnim);
        }

        ft.replace(mContainerId, frag);
        ft.setPrimaryNavigationFragment(frag);

        final @IdRes int destId = destination.getId();
        final boolean initialNavigation = mBackStack.isEmpty();
        // TODO Build first class singleTop behavior for fragments
        final boolean isSingleTopReplacement = navOptions != null && !initialNavigation
                && navOptions.shouldLaunchSingleTop()
                && mBackStack.peekLast() == destId;

        boolean isAdded;
        if (initialNavigation) {
            isAdded = true;
        } else if (isSingleTopReplacement) {
            // Single Top means we only want one instance on the back stack
            if (mBackStack.size() > 1) {
                // If the Fragment to be replaced is on the FragmentManager's
                // back stack, a simple replace() isn't enough so we
                // remove it from the back stack and put our replacement
                // on the back stack in its place
                mFragmentManager.popBackStack(
                        generateBackStackName(mBackStack.size(), mBackStack.peekLast()),
                        FragmentManager.POP_BACK_STACK_INCLUSIVE);
                ft.addToBackStack(generateBackStackName(mBackStack.size(), destId));
            }
            isAdded = false;
        } else {
            ft.addToBackStack(generateBackStackName(mBackStack.size() + 1, destId));
            isAdded = true;
        }
        if (navigatorExtras instanceof Extras) {
            Extras extras = (Extras) navigatorExtras;
            for (Map.Entry<View, String> sharedElement : extras.getSharedElements().entrySet()) {
                ft.addSharedElement(sharedElement.getKey(), sharedElement.getValue());
            }
        }
        ft.setReorderingAllowed(true);
        ft.commit();
        // The commit succeeded, update our view of the world
        if (isAdded) {
            mBackStack.add(destId);
            return destination;
        } else {
            return null;
        }
    }
可以看到,这里面是replace的方式进行切换的
ft.replace(mContainerId, frag);
ft.setPrimaryNavigationFragment(frag);
所以,当我们切换fragment的时候,生命周期的变化会频繁销毁和创建。
这里的话,我们改成添加和控制显示/隐藏的方式来替换掉。
修改NavFragmentHost切换fragment的方式
从前面的源码分析,我们知道了,切换是由FragmentNavigator去负责的。
如果我们直接继承这个类,去覆写navigate的方法,某些私有的属性用不了。
那怎么办呢?
既然都是继承自Navigator的,那我们也写一个我们的FragmentNavigator不就可以了吗?
其他代码复制FragmentNavigator的,然后修改即可。
修改完以后这样子了
HideSitchFragmentNavigator.java
代码:
/**
     * {@inheritDoc}
     * <p>
     * This method should always call
     * {@link FragmentTransaction#setPrimaryNavigationFragment(Fragment)}
     * so that the Fragment associated with the new destination can be retrieved with
     * {@link FragmentManager#getPrimaryNavigationFragment()}.
     * <p>
     * Note that the default implementation commits the new Fragment
     * asynchronously, so the new Fragment is not instantly available
     * after this call completes.
     */
    @SuppressWarnings("deprecation") /* Using instantiateFragment for forward compatibility */
    @Nullable
    @Override
    public NavDestination navigate(@NonNull FragmentNavigator.Destination destination, @Nullable Bundle args,
                                   @Nullable NavOptions navOptions, @Nullable Navigator.Extras navigatorExtras) {
        if (mFragmentManager.isStateSaved()) {
            Log.i(TAG, "Ignoring navigate() call: FragmentManager has already"
                    + " saved its state");
            return null;
        }
        String className = destination.getClassName();
        if (className.charAt(0) == '.') {
            className = mContext.getPackageName() + className;
        }
        String tag = className.substring(className.lastIndexOf(".") + 1);
        Fragment frag = mFragmentManager.findFragmentByTag(tag);
        //判断是否有添加,如果没有添加,则添加,并且显示
        //如果已经添加了,直接显示
        if (frag == null) {
            System.out.println(" create new fragment..." + tag);
            frag = instantiateFragment(mContext, mFragmentManager,
                    className, args);
        }
        frag.setArguments(args);
        final FragmentTransaction ft = mFragmentManager.beginTransaction();

        int enterAnim = navOptions != null ? navOptions.getEnterAnim() : -1;
        int exitAnim = navOptions != null ? navOptions.getExitAnim() : -1;
        int popEnterAnim = navOptions != null ? navOptions.getPopEnterAnim() : -1;
        int popExitAnim = navOptions != null ? navOptions.getPopExitAnim() : -1;
        if (enterAnim != -1 || exitAnim != -1 || popEnterAnim != -1 || popExitAnim != -1) {
            enterAnim = enterAnim != -1 ? enterAnim : 0;
            exitAnim = exitAnim != -1 ? exitAnim : 0;
            popEnterAnim = popEnterAnim != -1 ? popEnterAnim : 0;
            popExitAnim = popExitAnim != -1 ? popExitAnim : 0;
            ft.setCustomAnimations(enterAnim, exitAnim, popEnterAnim, popExitAnim);
        }

        //隐藏上一个显示的内容
        for (Fragment fragment : mFragmentManager.getFragments()) {
            System.out.println("hide fragment -- > " + fragment.getClass().getName());
            ft.hide(fragment);
        }

        if (!frag.isAdded()) {
            System.out.println("add fragment ... " + tag);
            ft.add(mContainerId, frag, tag);
        }

        ft.show(frag);
        //ft.replace(mContainerId, frag);
        ft.setPrimaryNavigationFragment(frag);

        final @IdRes int destId = destination.getId();
        final boolean initialNavigation = mBackStack.isEmpty();
        // TODO Build first class singleTop behavior for fragments
        final boolean isSingleTopReplacement = navOptions != null && !initialNavigation
                && navOptions.shouldLaunchSingleTop()
                && mBackStack.peekLast() == destId;

        boolean isAdded;
        if (initialNavigation) {
            isAdded = true;
        } else if (isSingleTopReplacement) {
            // Single Top means we only want one instance on the back stack
            if (mBackStack.size() > 1) {
                // If the Fragment to be replaced is on the FragmentManager's
                // back stack, a simple replace() isn't enough so we
                // remove it from the back stack and put our replacement
                // on the back stack in its place
                mFragmentManager.popBackStack(
                        generateBackStackName(mBackStack.size(), mBackStack.peekLast()),
                        FragmentManager.POP_BACK_STACK_INCLUSIVE);
                ft.addToBackStack(generateBackStackName(mBackStack.size(), destId));
            }
            isAdded = false;
        } else {
            ft.addToBackStack(generateBackStackName(mBackStack.size() + 1, destId));
            isAdded = true;
        }
        if (navigatorExtras instanceof HideSwitchFragmentNavigator.Extras) {
            HideSwitchFragmentNavigator.Extras extras = (HideSwitchFragmentNavigator.Extras) navigatorExtras;
            for (Map.Entry<View, String> sharedElement : extras.getSharedElements().entrySet()) {
                ft.addSharedElement(sharedElement.getKey(), sharedElement.getValue());
            }
        }
        ft.setReorderingAllowed(true);
        ft.commit();
        // The commit succeeded, update our view of the world
        if (isAdded) {
            mBackStack.add(destId);
            return destination;
        } else {
            return null;
        }
    }
这里是主要的代码,把replace替换成了hide
然后,我们写一个类去继承NavHostFragment,覆写里面的方法,我们前面看过代码。
NavHostFragment是在
 protected void onCreateNavController(@NonNull NavController navController) {
        navController.getNavigatorProvider().addNavigator(
                new DialogFragmentNavigator(requireContext(), getChildFragmentManager()));
        navController.getNavigatorProvider().addNavigator(createFragmentNavigator());
    }
创建FragmentNavigator的
所以我们覆写createFragmentNavigator的方法
class CustomNavHostFragment : NavHostFragment() {

    /**
     * Create the FragmentNavigator that this NavHostFragment will use. By default, this uses
     * [FragmentNavigator], which replaces the entire contents of the NavHostFragment.
     *
     *
     * This is only called once in [.onCreate] and should not be called directly by
     * subclasses.
     * @return a new instance of a FragmentNavigator
     */
    @Deprecated("Use {@link #onCreateNavController(NavController)}")
    override fun createFragmentNavigator(): Navigator<out FragmentNavigator.Destination?> {
        return HideSwitchFragmentNavigator(
            requireContext(), childFragmentManager,
            getContainerId()
        )
    }

    private fun getContainerId(): Int {
        val id = id
        return if (id != 0 && id != View.NO_ID) {
            id
        } else R.id.nav_host_fragment_container
        // Fallback to using our own ID if this Fragment wasn't added via
        // add(containerViewId, Fragment)
    }
}
我们的入口,就不要用NavHostFragment了
改成这样子
    <fragment
        android:id="@+id/nav_host_fragment"
        android:name="com.sunofbeaches.navigationdemo.view.CustomNavHostFragment"
        android:layout_width="match_parent"
        android:layout_height="match_parent"
        app:defaultNavHost="true"
        app:layout_constraintBottom_toTopOf="@id/nav_view"
        app:layout_constraintLeft_toLeftOf="parent"
        app:layout_constraintRight_toRightOf="parent"
        app:layout_constraintTop_toTopOf="parent"
        app:navGraph="@navigation/mobile_navigation" />
另外就是我们的Activity里,不要直接把navHostFragment与BottomNavigationView结合到一起。否则会把第一个做成singleTop模式,只要你切换到第一个,就会干掉其他的.
要修改成这样子:
 override fun onCreate(savedInstanceState: Bundle?) {
        super.onCreate(savedInstanceState)
        setContentView(R.layout.activity_main)
        //找到底部的导航控件
        val navView: BottomNavigationView = findViewById(R.id.nav_view)
        //找到hostFragment
        val navController = findNavController(R.id.nav_host_fragment)
        navView.setOnNavigationItemSelectedListener {
            when (it.itemId) {
                R.id.navigation_home -> {
                    navController.navigate(R.id.navigation_home)
                }
                R.id.navigation_dashboard -> {
                    navController.navigate(R.id.navigation_dashboard)
                }

                R.id.navigation_notifications -> {
                    navController.navigate(R.id.navigation_notifications)
                }
            }
            true
        }
    }
测试结果:
这是运行的log
I/System.out:  create new fragment...DashboardFragment
I/System.out: hide fragment -- > com.sunofbeaches.navigationdemo.ui.home.HomeFragment
I/System.out: =================================
I/System.out: add fragment ... DashboardFragment
I/System.out: fragment:onCreate :DashboardFragment
I/System.out: fragment:onResume :DashboardFragment
I/System.out: hide fragment -- > com.sunofbeaches.navigationdemo.ui.home.HomeFragment
I/System.out: hide fragment -- > com.sunofbeaches.navigationdemo.ui.dashboard.DashboardFragment
I/System.out: =================================
I/System.out: hide fragment -- > com.sunofbeaches.navigationdemo.ui.home.HomeFragment
I/System.out: hide fragment -- > com.sunofbeaches.navigationdemo.ui.dashboard.DashboardFragment
I/System.out: =================================
I/System.out:  create new fragment...NotificationsFragment
I/System.out: hide fragment -- > com.sunofbeaches.navigationdemo.ui.home.HomeFragment
I/System.out: hide fragment -- > com.sunofbeaches.navigationdemo.ui.dashboard.DashboardFragment
I/System.out: =================================
I/System.out: add fragment ... NotificationsFragment
I/System.out: fragment:onCreate :NotificationsFragment
I/System.out: fragment:onResume :NotificationsFragment
I/System.out: hide fragment -- > com.sunofbeaches.navigationdemo.ui.home.HomeFragment
I/System.out: hide fragment -- > com.sunofbeaches.navigationdemo.ui.dashboard.DashboardFragment
I/System.out: hide fragment -- > com.sunofbeaches.navigationdemo.ui.notifications.NotificationsFragm
I/System.out: =================================
okay,navigation我们就到这里吧,详细内容同学们请去看视频教程吧。